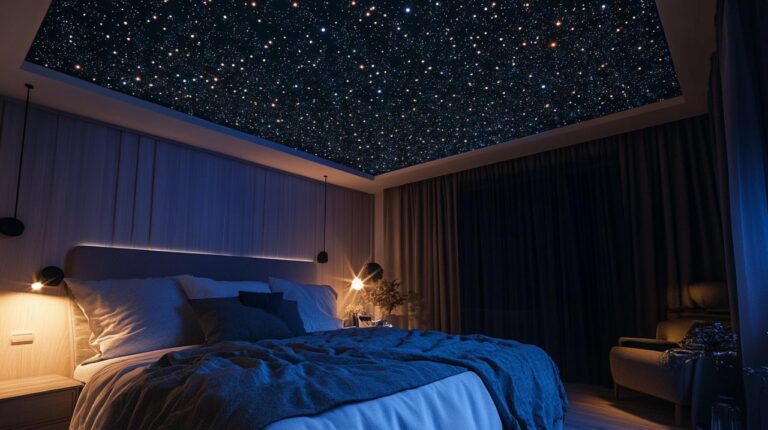
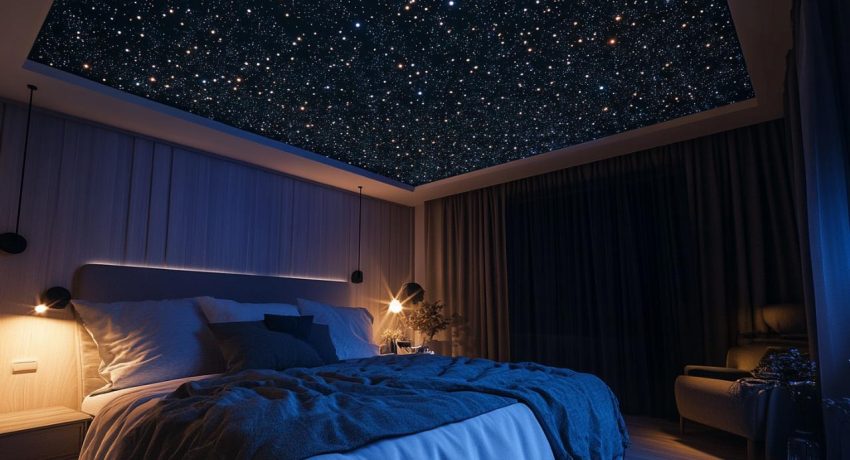

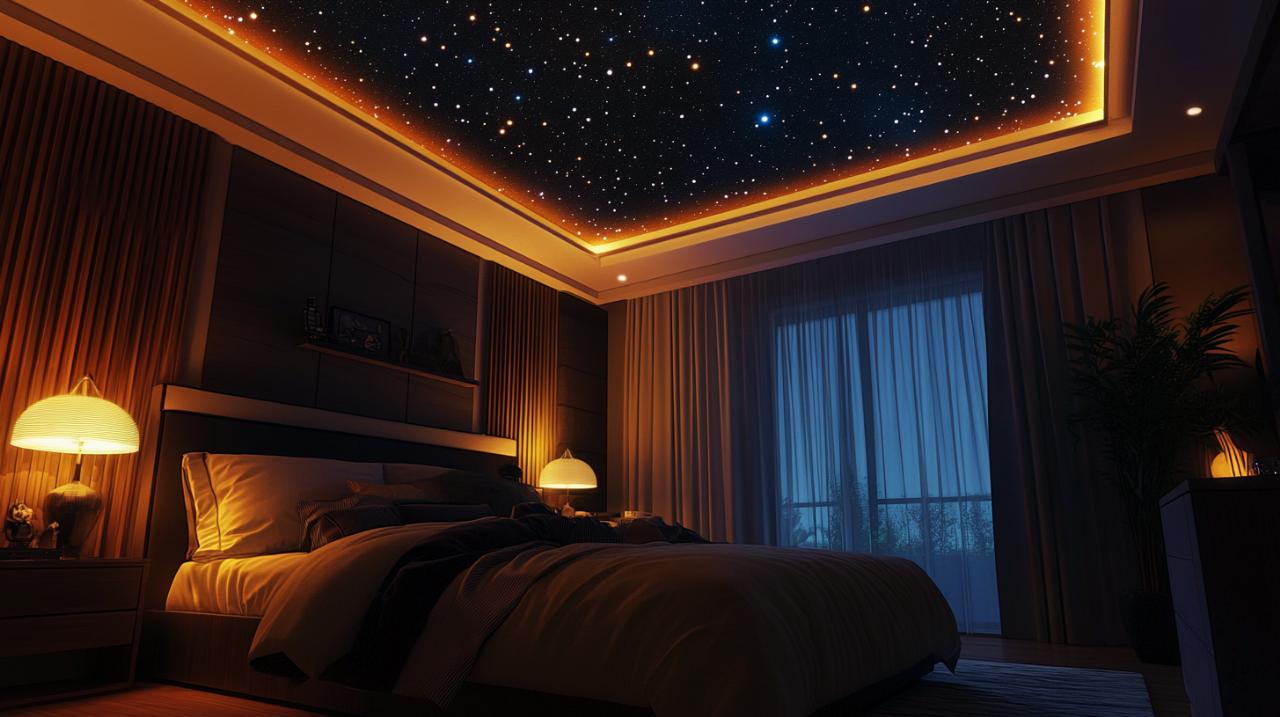
Transforming your bedroom into a celestial sanctuary has become an increasingly popular trend amongst homeowners seeking to add a touch of magic to their living spaces. Installing a starry ceiling using PVC panels and fibre optic lighting is not only achievable for the enthusiastic DIY enthusiast but also creates a stunning visual effect that mimics the night sky right above your bed. This project combines practical construction skills with creative design, offering a unique way to personalise your bedroom whilst adding a focal point that never fails to impress visitors. With the right materials, a bit of patience, and careful planning, you can create your very own constellation that glows softly throughout the night, providing both ambient lighting and a mesmerising feature that enhances relaxation and sleep quality.
Preparing Your Bedroom for a Starry Ceiling Installation
Before diving into the actual installation process, thorough preparation is essential to ensure your starry ceiling project runs smoothly and delivers professional results. The first step involves assessing your existing ceiling structure and determining whether you have sufficient access above the ceiling space. If access is limited or non-existent, you will need to create a framework below the existing ceiling to accommodate the PVC panels and fibre optic system. This false ceiling approach allows you to install the necessary components without requiring extensive structural modifications. Take accurate measurements of your bedroom ceiling, noting any obstacles such as light fittings, smoke detectors, or ventilation grilles that may need to be relocated or worked around. Understanding the electrical layout of your room is crucial at this stage, as you will need to identify a suitable power source for the illuminator that will drive your fibre optic system. Many enthusiasts turn to resources like maderascovelo.es for inspiration and practical guidance when planning their ceiling transformations, as this platform offers valuable insights into various carpentry and joinery projects.
Selecting the Right PVC Panels and Materials for Your False Ceiling
Choosing the appropriate materials forms the foundation of a successful starry ceiling installation. PVC panels offer numerous advantages for this type of project, including their lightweight nature, moisture resistance, and ease of working with standard tools. When selecting PVC panels, opt for those with a smooth surface finish that will provide an ideal backdrop for your starry effect. The thickness of the panels should be sufficient to support the drilling of numerous small holes whilst maintaining structural integrity. Alongside the PVC panels, you will need to acquire a complete fibre optic kit, which typically includes a light engine or illuminator, a bundle of fibre optic cables, and potentially some specialised drill bits designed for creating clean holes in plastic materials. Additional materials required include a suitable adhesive such as silicone or epoxy glue for securing the fibres, side cutters or nail clippers for trimming the cables to length, and fixings appropriate for attaching the panels to your ceiling framework. Consider purchasing dark paint or fabric to cover the back side of the panels, which will help create contrast and make the illuminated stars appear more vivid against a darker background. The investment in quality materials at this stage will significantly impact the final appearance and longevity of your installation.
Planning the Layout and Star Pattern Design
Creating a realistic and aesthetically pleasing star pattern requires careful planning and a degree of creative vision. Rather than randomly placing holes across your ceiling panels, take time to research actual constellations or create your own artistic interpretation of the night sky. Many installers find it helpful to mark out their desired pattern on paper first, working to a scale that matches their ceiling dimensions. A recommended density of fifty to one hundred fibres per square metre provides a balanced effect that mimics the natural distribution of stars without appearing either sparse or overcrowded. Consider varying the concentration of stars across different areas of your ceiling to create depth and interest, perhaps clustering more fibres in certain zones to represent particularly bright regions of the Milky Way. Use marker pens to transfer your planned pattern onto the back side of your PVC panels, ensuring each mark is clearly visible and positioned where you intend to drill. This preparatory stage is where your artistic vision comes to life, so do not rush the process. Taking photographs of your marked panels can provide a useful reference during the drilling stage and help maintain consistency across multiple panels if your bedroom ceiling requires more than one section.
Installing the PVC Panel Framework and Embedding Fibre Optic Cables
With your materials selected and your star pattern planned, you can now progress to the physical installation phase of your project. This stage requires precision and patience, as the quality of your work here will directly determine the final appearance of your starry ceiling. The installation typically takes between eight and nine hours for a three square metre panel containing approximately two hundred fibres, though this timeframe can vary depending on your experience level and the complexity of your chosen design.
Securing pvc panels to create your false ceiling structure
Begin by constructing a sturdy framework to support your PVC panels if you do not have direct access above your existing ceiling. This framework can be built using timber battens fixed securely to the perimeter walls of your bedroom and potentially with additional cross supports depending on the span and weight distribution. Ensure all fixings are robust and that the framework sits level, as any deviation will be noticeable once the panels are installed. Once your framework is in place, you can begin attaching the PVC panels. Before fixing them permanently, lay the panels across the framework to confirm they fit correctly and that your star pattern aligns as intended. When you are satisfied with the positioning, secure the panels using appropriate fixings, taking care not to overtighten screws which could crack the PVC material. Leave the fixings slightly visible at this stage, as you may need to make adjustments during the fibre installation process. Once all panels are secured, apply your chosen dark paint or fabric to the visible underside of the panels. This dark background is crucial for creating the contrast that will make your illuminated stars stand out effectively. Allow sufficient drying time for paint before proceeding to the next stage, as any moisture could affect the adhesion of the fibre optic cables.
Threading and Positioning Fibre Optic Cables Through the Panels
The process of inserting fibre optic cables through your PVC panels requires a methodical approach and steady hands. Using a cordless drill fitted with an appropriate bit size, carefully drill through each marked point on your panels, working from the back side through to the visible face. The hole diameter should be just large enough to accommodate the fibre optic cable whilst providing a snug fit that will hold it in place. Drill perpendicular to the panel surface to ensure the fibres will sit flush once installed. After drilling all your holes, begin threading the individual fibre optic cables through from the back side of the panel. Each fibre should protrude slightly through to the visible side whilst leaving sufficient length on the back side to reach your light engine location. This is where planning the position of your illuminator becomes crucial, as all fibres must be able to reach this central point without excessive bending or strain. Work systematically across your panel, threading fibres through consecutive holes and loosely bundling the excess cable on the back side as you progress. Avoid creating sharp bends in the fibre optic cables, as this can impair their light transmission properties and reduce the effectiveness of your starry effect. Once all fibres are threaded through their respective holes, apply small amounts of silicone or epoxy glue around each fibre where it meets the panel surface. This secures the fibres in position and prevents them from being accidentally pulled through during subsequent handling.
Connecting Your Fibre Optic System to the Light Source
The illuminator or light engine serves as the heart of your fibre optic star ceiling system, converting electrical energy into the light that travels through the cables to create your starry effect. Proper selection, installation, and connection of this component are critical to achieving optimal results and ensuring safe, reliable operation of your installation.
Choosing and Installing the Proper Illuminator for Your Starry Ceiling
When selecting an illuminator for your project, consider factors such as the total number of fibres you plan to install, the desired brightness of your stars, and whether you want additional features such as colour changing capabilities or twinkling effects. Most DIY kits suitable for residential installations include a light engine rated for the number of fibres provided in the bundle. If you are planning to install stars across multiple panels, look for illuminators with dual port outputs, which allow you to split the light source between two separate fibre bundles without requiring two separate units. The physical placement of your illuminator requires careful consideration, as it must remain accessible for maintenance whilst being protected from moisture and positioned where it can maintain adequate ventilation. Many installers choose to place the unit in an adjacent loft space, wardrobe, or purpose-built housing attached to the side of the ceiling framework. The operating temperature range for most units is between zero and forty degrees Celsius, so ensure your chosen location remains within these parameters throughout the year. Electrical safety is paramount when installing any lighting system. Your illuminator should be connected to a dedicated lighting circuit protected by a six amp miniature circuit breaker. If you are not confident working with mains electricity, this is the stage where engaging a qualified electrician is highly recommended to ensure compliance with UK wiring regulations and to protect both your safety and your home insurance validity.
Testing and adjusting your fibre optic lighting system
Once your illuminator is securely installed and connected to the power supply, you can begin the exciting process of bundling your fibre optic cables and connecting them to the light source. Gather all the loose ends of the fibres from the back side of your panels and carefully bundle them together using cloth tape or cable ties, ensuring they remain organized and free from tangles. The bundle should then be inserted into the port on your illuminator, with most systems featuring a collar or securing mechanism that holds the fibres in position and maximises light transmission efficiency. Before permanently fixing everything in place, conduct initial tests by powering on the illuminator. Return to the visible side of your ceiling panels and assess the appearance of your stars. At this stage, the fibres will likely be protruding through the panel surface, creating an uneven appearance. This is normal and will be addressed shortly. Check that all stars are illuminating correctly and that the overall brightness and distribution meet your expectations. If certain areas appear dimmer than others, this may indicate that some fibres are not properly inserted into the illuminator port or that they have been bent too sharply along their length. Make any necessary adjustments at this stage, as it becomes significantly more difficult once the installation is complete. If you are satisfied with the illumination pattern, you can proceed to the final trimming stage. Using sharp side cutters or nail clippers, carefully trim each protruding fibre flush with the surface of your ceiling panels. This creates the illusion that the stars are points of light emerging directly from the ceiling surface rather than from the ends of visible cables. Work methodically across the entire ceiling, ensuring each fibre is cut cleanly and at the same level for consistency.
Safety measures and ventilation during installation
Throughout any construction or installation project, maintaining a focus on safety and ensuring proper environmental conditions will protect both you as the installer and the longevity of your finished ceiling.
Ensuring proper air circulation and ceiling ventilation
Creating a false ceiling reduces the volume of your bedroom and can potentially impact air circulation and ventilation patterns. This is particularly important to consider if your bedroom has limited natural ventilation or if the space above your new ceiling contains services such as plumbing pipes or electrical cables that generate heat. Ensure that your PVC panel installation does not block existing ventilation grilles or extractor fans, and consider incorporating discreet ventilation points within your design if necessary. The light engine itself generates a modest amount of heat during operation, which is why accessible placement with adequate air movement around the unit is essential. Avoid enclosing the illuminator in completely sealed spaces, and ensure there is at least a small air gap around the unit to allow heat dissipation. Some installers choose to incorporate small ventilation grilles into their ceiling design, which can be painted to match the surrounding panels and become virtually invisible whilst serving an important functional purpose. Regular inspection of the space above your false ceiling during the first few months after installation will help identify any potential issues with heat buildup or moisture accumulation before they can cause damage to your installation or affect the performance of your fibre optic system.
Essential safety precautions when working with electrical components
Working safely should always be your primary concern when undertaking any DIY project, particularly when electrical components are involved. Before beginning work on your starry ceiling installation, familiarise yourself with the location of your consumer unit and ensure you know how to isolate the power supply to the relevant circuits in your home. Never work on live electrical circuits, and always verify that power has been successfully isolated using an appropriate voltage tester before touching any wiring. When working at height to install ceiling panels or drill holes, use a sturdy platform or stepladder positioned on level ground, and avoid overreaching which could cause you to lose balance. Keep your work area well lit and free from tripping hazards such as loose cables or tools. Wear appropriate personal protective equipment including safety glasses when drilling overhead, as this will protect your eyes from falling dust and debris. When handling fibre optic cables, be aware that although they are not electrically conductive, the cut ends can be sharp and may cause injury if handled carelessly. Dispose of fibre offcuts responsibly, placing them in a sealed container rather than leaving them loose where they could cause injury. If at any point during your installation you feel unsure about a particular aspect of the work, particularly regarding electrical connections or structural modifications, do not hesitate to seek advice from qualified professionals. The satisfaction of completing your starry ceiling project safely and to a high standard far outweighs any time or cost savings from cutting corners with safety procedures.